Welcome to Part 2 of our Laravel Vue.js POS Tutorial series! In this guide, you’ll learn how to transform your Laravel project into a fully functional Laravel Vue.js SPA (Single Page Application). By integrating Vue.js into your Laravel POS system, you’ll create a fast, responsive, and modern user interface that eliminates unnecessary page reloads and improves user experience.
This tutorial covers the step-by-step process of setting up your Laravel Vue.js SPA, including installing essential frontend libraries like Vue 3, Vue Router, and Bootstrap 5. You’ll also download and organize the NiceAdmin Bootstrap 5 template, restructure your frontend assets, and integrate it seamlessly with your SPA layout.
Additionally, you’ll configure Laravel API routes for dynamic data interaction and update your Vite configuration to support Vue components and asset bundling. These steps are crucial to building a smooth, production-ready Laravel Vue.js SPA that serves as the foundation for a powerful and professional POS system.
By the end of this tutorial, your project will be well-structured and visually polished—ready for advanced features like real-time sales, user roles, and more.
Table of Contents
Step 1: Install Required Packages
Begin setting up your Laravel Vue.js SPA by installing the essential frontend tools including Vue 3, Vue Router, Bootstrap 5, and related dependencies. These packages lay the groundwork for building a responsive and dynamic single page application.
As these libraries are required for our project, please proceed with installing them
- Laravel Sanctum – For simple and secure API authentication
- maatwebsite/excel – Laravel package for exporting sales reports to Excel or CSV
- Vue 3 – Frontend JavaScript framework for building dynamic, component-based UIs
- Vue Router – Enables client-side routing within the Vue application
- Pinia – State management system to handle cart, product data, and user interactions
- Bootstrap 5 – CSS framework for building responsive, mobile-first layouts
- Bootstrap Icons – A modern icon library designed to integrate with Bootstrap
- Axios – Promise-based HTTP client used to connect Vue components with Laravel APIs
- Day.js – Lightweight JavaScript date library for formatting and manipulating dates
- print-js – Client-side utility to print receipts or invoices directly from the browser
- vue-flatpickr-component – Vue 3 wrapper for the popular Flatpickr date picker
- vue-loading-overlay – Easy-to-use loading indicators for async operations like saving data
- vue3-apexcharts – Charting library for displaying reports, analytics, and sales trends
Open the Command Prompt (CMD), navigate to your project root directory, and run the following command:
npm install bootstrap bootstrap-icons dayjs print-js vue vue-router pinia vue-flatpickr-component vue-loading-overlay vue3-apexchartsnpm install --save-dev @vitejs/plugin-vuecomposer require maatwebsite/excelSetup Laravel Sanctum API
php artisan install:api
Update file bootstrap/app.php and add this line to middleware section
   ->withMiddleware(function (Middleware $middleware): void {
        $middleware->statefulApi();    // add this line
    })
Please add the [Laravel\Sanctum\HasApiTokens] trait to your User model by updating this existing file app/Models/User.php
use Laravel\Sanctum\HasApiTokens;

class User extends Authenticatable
{
    use HasApiTokens, ...;
}
Step 2: Download NiceAdmin Template
Enhance your Laravel Vue.js SPA with a polished UI by downloading the free NiceAdmin Bootstrap 5 template. This theme provides a professional design that integrates smoothly with your Vue components.
To integrate the NiceAdmin template into your Laravel project, start by downloading it from the BootstrapMade. Once downloaded, you can copy the necessary asset files—such as JavaScript, CSS, fonts, and images—into your Laravel project.
You can either use the full template as-is or customize it by removing sections you don’t need. If you prefer, you can follow the step-by-step instructions in this tutorial to use only the essential assets required for our Laravel Vue.js POS system.
Step 3: Organize Assets, Styles, and JavaScript
Properly structure and import the NiceAdmin template’s CSS, JavaScript, fonts, and images into your Laravel project. Organizing assets is a key step in ensuring a clean and maintainable Laravel Vue.js SPA frontend.
Place downloaded JS and CSS files from NiceAdmin (like style.css and main.js) or just download from here to place into resources/css and resources/js
💡 Tip: To ensure the project loads smoothly without broken images, you can download this default image and place it inside your Laravel project’s PROJECT_ROOT/public/ folder. This helps prevent errors when no uploaded images are available yet.
Replace the contents of resources/css/app.css with the code below. If the file doesn’t exist yet, please create it.
.form-label {
    margin-bottom: 0px !important;
}

label.required::after {
    content: " *";
    color: red;
}

.btn-close {
    width: 3rem;
    height: 2rem;
    padding: 0px;
}

.modal-content {
    background: whitesmoke;
}

.table tbody tr {
    vertical-align: middle;
}

.form-check-input {
    border-color: #6e6e6e;
}

.form-switch .form-check-input {
    width: 3em;
    height: 1.5em;
}

.form-check-input[type=checkbox]:indeterminate.permission,
.form-check-input:checked.permission {
    background-color: green !important;
    border-color: green !important;
}

.form-check-input[type=checkbox]:indeterminate#permission,
.form-check-input:checked#permission {
    background-color: red !important;
    border-color: red !important;
}

.pagetitle {
    margin-bottom: 1rem;
}

.bi-sort-alpha-down-alt,
.bi-sort-alpha-down,
.bi-arrow-down-up {
    font-size: 12px;
}

.table>:not(caption)>*>* {
    padding: 0.5rem 1rem !important;
}

span.menu-item {
    background: darkslateblue !important;
    color: white !important;
    border-color: white !important;
    font-size: 18px;
}

span.active {
    background: #b02a37 !important;
    color: white !important;
    border-color: white !important;
    font-size: 18px;
}

.vl-overlay .vl-background {
    opacity: 0.2 !important;
}
Step 4: Setup Vue SPA (Router, Component, Layout) and Integrate NiceAdmin Template
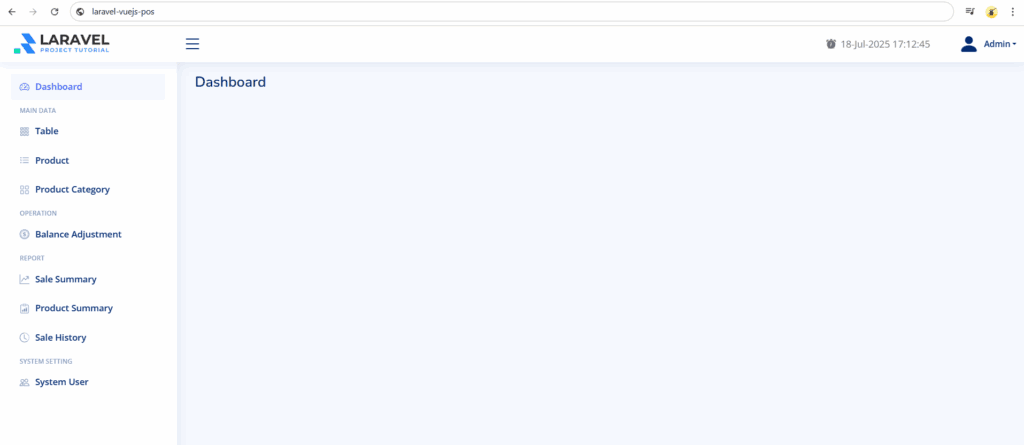
Turn your Laravel project into a functional Vue.js SPA by setting up Vue Router, creating reusable components, and embedding the NiceAdmin layout into your app shell. This brings your Laravel Vue.js SPA to life with a fully interactive interface.
Replace the contents of resources/views/welcome.blade.php with the code below. If the file doesn’t exist yet, please create it.
<!DOCTYPE html>
<html lang="{{ str_replace('_', '-', app()->getLocale()) }}">

<head>
    <meta charset="utf-8">
    <meta name="viewport" content="width=device-width, initial-scale=1">
    <link rel="icon" type="image/png" href="images/favicon.png">
    <title>{{ config('app.name', 'Title') }}</title>

    <!-- Google Fonts -->
    <link href="https://fonts.gstatic.com" rel="preconnect">
    <link
        href="https://fonts.googleapis.com/css?family=Open+Sans:300,300i,400,400i,600,600i,700,700i|Nunito:300,300i,400,400i,600,600i,700,700i|Poppins:300,300i,400,400i,500,500i,600,600i,700,700i"
        rel="stylesheet">
    @vite('resources/js/app.js')
</head>

<body style="display: none">
    <div id="app">
        <router-view></router-view>
    </div>
</body>

</html>
Replace the contents of resources/js/component/layout/Admin.vue with the code below. If the file doesn’t exist yet, please create it.
<template>
    <div>
        <header id="header" class="header fixed-top d-flex align-items-center">
            <div class="d-flex align-items-center justify-content-between">
                <a href="/" class="logo d-flex align-items-center">
                    <img src="images/logo.png" alt="">
                </a>
                <i class="bi bi-list toggle-sidebar-btn"></i>
            </div>
            <nav class="header-nav ms-auto">
                <ul class="d-flex align-items-center">
                    <li class="d-none d-md-inline-block form-inline ms-auto nav-item dropdown me-5">
                        <i class="bi bi-alarm-fill text-secondary pe-2"></i>
                        <span class="text-secondary">{{ dayjs(new Date()).format("DD-MMM-YYYY HH:mm:ss") }}</span>
                    </li>
                    <li class="nav-item dropdown pe-3">
                        <a class="nav-link nav-profile d-flex align-items-center pe-0" href="#"
                            data-bs-toggle="dropdown">
                            <i class="bi bi-person-fill" style="font-size: 35px;"></i>
                            <span class="d-none d-md-block dropdown-toggle ps-2 text-capitalize">Admin</span>
                        </a>
                        <ul class="dropdown-menu dropdown-menu-end dropdown-menu-arrow profile">
                            <li>
                                <button class="dropdown-item d-flex align-items-center">
                                    <i class="bi bi-shield-lock"></i>
                                    <span>Change Password</span>
                                </button>
                            </li>
                            <li>
                                <hr class="dropdown-divider">
                            </li>
                            <li>
                                <button type="submit" class="dropdown-item d-flex align-items-center">
                                    <i class="bi bi-box-arrow-right"></i>
                                    <span>Sign Out</span>
                                </button>
                            </li>
                        </ul>
                    </li>
                </ul>
            </nav>

        </header>

        <!-- ======= Sidebar ======= -->
        <aside id="sidebar" class="sidebar">
            <ul class="sidebar-nav" id="sidebar-nav">
                <li class="nav-item">
                    <router-link :to="{ name: 'dashboard' }"
                        :class="['nav-link', { collapsed: $route.name != 'dashboard' }]">
                        <i class="bi bi-speedometer2"></i>
                        <span>Dashboard</span>
                    </router-link>
                </li>
                <li class="nav-heading">Main Data</li>
                <li class="nav-item">
                    <a href="#" class="nav-link collapsed">
                        <i class="bi bi-grid-3x3-gap"></i>
                        <span>Table</span>
                    </a>
                </li>
                <li class="nav-item">
                    <a href="#" class="nav-link collapsed">
                        <i class="bi bi-list-ul"></i>
                        <span>Product</span>
                    </a>
                </li>
                <li class="nav-item">
                    <a href="#" class="nav-link collapsed">
                        <i class="bi bi-grid"></i>
                        <span>Product Category</span>
                    </a>
                </li>
                <li class="nav-heading">Operation</li>
                <li class="nav-item">
                    <a href="#" class="nav-link collapsed">
                        <i class="bi bi-coin"></i>
                        <span>Balance Adjustment</span>
                    </a>
                </li>
                <li class="nav-heading">Report</li>
                <li class="nav-item">
                    <a href="#" class="nav-link collapsed">
                        <i class="bi bi-graph-up-arrow"></i>
                        <span>Sale Summary</span>
                    </a>
                </li>
                <li class="nav-item">
                    <a href="#" class="nav-link collapsed">
                        <i class="bi bi-clipboard-data"></i>
                        <span>Product Summary</span>
                    </a>
                </li>
                <li class="nav-item">
                    <a href="#" class="nav-link collapsed">
                        <i class="bi bi-clock-history"></i>
                        <span>Sale History</span>
                    </a>
                </li>
                <li class="nav-heading">System Setting</li>
                <li class="nav-item">
                    <a href="#" class="nav-link collapsed">
                        <i class="bi bi-people"></i>
                        <span>System User</span>
                    </a>
                </li>
            </ul>
        </aside>

        <main id="main" class="main">
            <router-view></router-view>
        </main>
    </div>
</template>
<script setup>
import dayjs from 'dayjs';
import { onMounted } from 'vue';
onMounted(() => {
    import("../../main.js");
    document.body.style.display = "block";

});
</script>
Replace the contents of resources/js/component/dashboard/Dashboard.vue with the code below. If the file doesn’t exist yet, please create it.
<template>
    <div>
        <div class="pagetitle">
            <h1>Dashboard</h1>
        </div>
    </div>
</template>
Replace the contents of resources/js/router/index.js with the code below. If the file doesn’t exist yet, please create it.
import { createRouter, createWebHistory } from 'vue-router';

const routes = [
    {
        path: "/",
        component: () => import("@/component/layout/Admin.vue"),
        children: [
            // ========= Dashboard =========
            {
                path: "/",
                name: "dashboard",
                component: () => import("@/component/dashboard/Dashboard.vue"),
            },
        ],
    }
]

const router = createRouter({
    history: createWebHistory(),
    routes,
})

export default router
Replace the contents of resources/js/app.js with the code below. If the file doesn’t exist yet, please create it.
import './bootstrap';
import 'bootstrap/dist/css/bootstrap.min.css';
import 'bootstrap-icons/font/bootstrap-icons.min.css';
import 'bootstrap';
import '../css/style.css';
import '../css/app.css';

import { createApp } from 'vue'
import { createPinia } from 'pinia'
import router from './router'

const app = createApp();
app.use(createPinia())
app.use(router)
app.mount('#app')
Step 4: Update Vite Config for Vue.js
Customize the vite.config.js file to handle Vue components, resolve paths, and optimize asset loading. This configuration ensures efficient development and smooth builds for your Laravel Vue.js SPA.
Replace the contents of vite.config.js with the code below.
import { defineConfig } from 'vite';
import laravel from 'laravel-vite-plugin';
import vue from '@vitejs/plugin-vue';

export default defineConfig({
    plugins: [
        laravel({
            input: ['resources/js/app.js'],
            refresh: true,
        }),
        vue({
            template: {
                transformAssetUrls: {
                    base: null,
                    includeAbsolute: false,
                },
            },
        })
    ],
    resolve: {
        alias: {
            vue: 'vue/dist/vue.esm-bundler.js',
        },
    },
});
Running and Testing Your Project
Open your Terminal/CMD in separate windows, go to the project’s root folder, and then run the command below:
npm run devphp artisan serveWith both commands running in their separate windows, open your web browser to the Laravel address (http://127.0.0.1:8000).
Setup Complete
Great job! 🎉 You’ve now successfully set up a fully functional Laravel Vue.js SPA and integrated the NiceAdmin Bootstrap template into your POS project. Your system now features a modern, responsive UI with a clean layout structure—complete with header, sidebar, content area, and footer—ready to support powerful, dynamic features.
In the next tutorial, we’ll move on to data migration and authentication. You’ll create the necessary database tables, models, and controllers, seed the system with dummy data, and implement a basic login system to manage different user roles like admin and cashier.
👉 Continue to Part 3: Data Migration & Authentication
Laravel Vue.js POS Tutorial for Beginners Series
This step-by-step series will guide you through building a complete Laravel Vue.js POS system from scratch:
- Part 1: Install Laravel Framework
Set up a fresh Laravel 12 project and configure the environment and database for your POS backend. - Part 2: Create Vue SPA & Integrate NiceAdmin
Convert Laravel into a Vue.js SPA with Vue Router, install Vue 3, Bootstrap 5, and integrate the NiceAdmin template for a modern UI. - Part 3: Data Migration & Authentication
Migrate tables for users, roles, and products. Add authentication using Laravel Sanctum. - Part 4: Navigation & CRUD Operations
Build dynamic sidebar navigation and implement CRUD for products, categories, and users using API and Vue components. - Part 5: POS Cart System
Create a POS cart where users can add, update, and remove items using Vue 3’s built-in reactivity. - Part 6: Reports & Sales Filters
Add sales report filtering by date, user, or payment. Enable Excel export and receipt printing. - Part 7: Dashboard with ApexCharts
Display real-time sales data in responsive charts using ApexCharts.