Sending SMS directly from Laravel is extremely useful for OTP verification, order updates, alerts, or any real-time notification. Laravel makes this even easier with its built-in Notification system — and all we need is an SMS provider.
In this tutorial, you’ll learn how to send SMS from Laravel using Vonage (previously Nexmo). We will configure API keys, register phone numbers, create a Notification class, and send SMS in just a few steps.
Table of Contents
Step 1: Create a New Laravel Project
Open your terminal and create a new Laravel project:
You’ll first run:
composer global require laravel/installer(You only need to run this once globally).
Then you can run this command to get the interactive experience and create your project.
laravel new laravel-project-nameGo to the project folder:
cd laravel-project-nameRun the migration command
php artisan migrateThen start the Laravel development server:
php artisan serveAfter that, open another terminal and run these commands:
npm installnpm run devVisit http://localhost:8000 — you should see the Laravel welcome page.

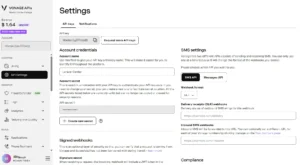
Step 2: Create a Vonage (Nexmo) Account & Get API Credentials
Laravel does not send SMS directly — we need a provider like Vonage, Twilio, or Fast2SMS. In this post, we will use Vonage, because it integrates very cleanly with Laravel.
To send SMS from Laravel, first register a Vonage account and get your API Key and Secret. These credentials allow Laravel to connect with the SMS API.
- Go to https://dashboard.nexmo.com/sign-up
- Create an account and verify your phone number
- Inside the Vonage dashboard → copy:
- API Key
- API Secret
- You will use these in the
.envfile

Step 3: Install Vonage (Nexmo) Laravel Package
Next, install the official Vonage SDK package so your application can send SMS from Laravel through the Vonage API service.
Run this command:
composer require laravel/vonage-notification-channel guzzlehttp/guzzleOnce installed, Laravel will be able to send SMS messages through Vonage (Nexmo) using your credentials.
Step 4: Configure Vonage in the .env File
Add your Vonage API Key, Secret, and SMS sender name into the .env file. This step is required before you can send SMS from Laravel successfully.
Open your project’s .env file and add your Vonage (Nexmo) credentials:
# .env
VONAGE_KEY="YOUR_VONAGE_API_KEY"
VONAGE_SECRET="YOUR_VONAGE_API_SECRET"
VONAGE_SMS_FROM="YOUR_VONAGE_VIRTUAL_NUMBER"
This configuration securely stores your Vonage (Nexmo) details and makes them accessible throughout your Laravel project.
Step 5: Create an SMS Notification Class
Use Laravel’s Notification system to build a custom notification class that sends SMS through Vonage. This is the main logic to send SMS from Laravel.
To create a new notification class, run:
php artisan make:notification SMSNotificationThis will create a new file:app/Notifications/SMSNotification.php
Open the file and update it as follows:
<?php

namespace App\Notifications;

use Illuminate\Bus\Queueable;
use Illuminate\Notifications\Messages\VonageMessage;
use Illuminate\Notifications\Notification;

class SMSNotification extends Notification
{
    use Queueable;

    private $OTPCode;
    /**
     * Create a new notification instance.
     */
    public function __construct($OTPCode)
    {
        $this->OTPCode = $OTPCode;
    }

    /**
     * Get the notification's delivery channels.
     *
     * @return array<int, string>
     */
    public function via(object $notifiable): array
    {
        return ['vonage'];
    }

    /**
     * Get the sms representation of the notification.
     */
    public function toVonage(object $notifiable): VonageMessage
    {
        return (new VonageMessage())
            ->content("Your verification code is: {$this->OTPCode}. Do not share this code.");
    }

    /**
     * Get the array representation of the notification.
     *
     * @return array<string, mixed>
     */
    public function toArray(object $notifiable): array
    {
        return [
            //
        ];
    }
}
Step 6: Trigger the SMS Notification
Call notify() on a user model to trigger sending the message. This is the final action where you actually send SMS from Laravel.
In your web.php file, add:
use App\Notifications\SMSNotification;
use Illuminate\Support\Facades\Notification;
use Illuminate\Support\Facades\Route;

Route::get('send-sms', function () {
    // generate random OTP Code
    $code = random_int(100000, 999999);

    // The destination phone number (must be in E.164 format)
    $phoneNumber = '+85589456111';

    // The Notification::route() method accepts the channel ('vonage') and the destination (the phone number).
    Notification::route('vonage', $phoneNumber)
        ->notify(new SMSNotification($code));

    // A simplified way to think about it:
    // Notification::route('CHANNEL_NAME', 'DESTINATION_ADDRESS')->notify(new YOUR_NOTIFICATION());

    return 'The SMS was successfully sent!';
});
This uses Laravel’s built-in notify() method to send the SMS through Vonage (Nexmo).
Final Step: Running and Testing Your Project
To test your project, run the Laravel server:
php artisan serveIf your project also uses Vue.js, run the frontend in a separate terminal:
npm run devAfter both are running, open your browser and visit:
http://127.0.0.1:8000/send-smsMake sure all pages load and your feature
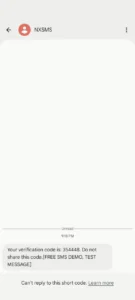
If everything is set up correctly, you’ll receive an SMS in the recipient’s phone.
Conclusion
You’ve just learned how to send SMS from Laravel using its Notification system and the Vonage (Nexmo) API. This method is clean, reusable, and perfectly integrates with Laravel’s event-driven architecture — making it ideal for sending OTPs, order confirmations, and other real-time alerts.
With just a few steps, you can enhance user engagement through instant text messaging. Next, try extending this setup with queues to handle large volumes or combine it with email notifications for a complete multi-channel system.
Laravel Notifications support many channels — including mail, database, Slack, and SMS. Once you’ve mastered how to send SMS from Laravel, you can explore other drivers to build a unified notification system for your app.
If you want to explore more notification methods, check out our guide on Laravel Gmail SMTP Configuration – Send Email Notifications Step by Step to combine both email and SMS into your app’s notification system.