Laravel Vue.js SPA Google Login allows users to sign in easily using their Google accounts, enhancing both user experience and security. In this tutorial, you’ll learn how to implement Google login in your Laravel and Vue.js single-page application using Laravel Socialite.
Before you begin, make sure you’ve completed our previous guide — “Laravel Vue.js SPA Session Based Authentication.” This tutorial builds directly on that setup, so ensure your Laravel and Vue.js authentication system is already functioning before integrating Google OAuth.
By the end of this guide, you’ll have a fully working Laravel Vue.js SPA Google Login system that securely authenticates users through Google and synchronizes their session seamlessly with your SPA frontend.
Table of Contents
Step 1: Check Out the Previous Tutorial First
Before starting this guide, make sure you’ve already completed the setup from the previous post: Laravel 12 Vue 3 Session Based Authentication – Complete SPA Tutorial for Beginners.
👉 This tutorial builds on top of that project structure, so having it ready will help you continue smoothly.
You can read it here: https://laravelcenter.com/laravel-12-vue-3-session-based-authentication/
Step 2: Create Google OAuth Client for Laravel Socialite
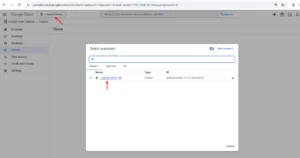
Start the Laravel Vue.js SPA Google Login setup by creating a Google OAuth client in the Google Cloud Console. You’ll need the Client ID and Secret to connect your Laravel app with Google’s authentication service.
Go to Google Cloud Console
Visit:
🔗 https://console.cloud.google.com/
If you’re not signed in yet, log in with your Google account.
Create a New Project
- Click the project dropdown (top left near the Google Cloud logo).
- Click “New Project”.
- Give it a name, for example:
👉 Laravel Center - Click Create.

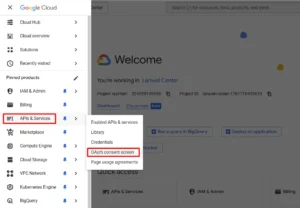
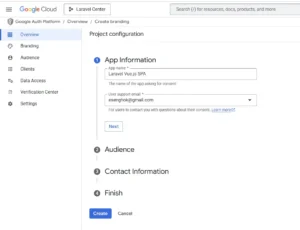
Configure OAuth Consent Screen
- Fill in App Information:
- App name: Laravel Vue.js SPA
- User support email: your email
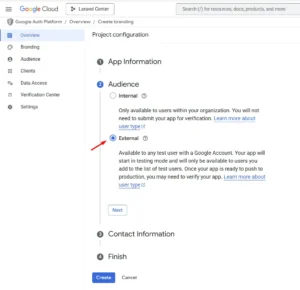
- Audience: Choose External (so any user can log in).
- Contact Information: Enter email
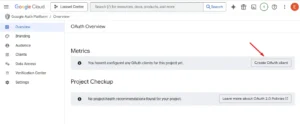
- Submit and go back to OAuth Overview page.
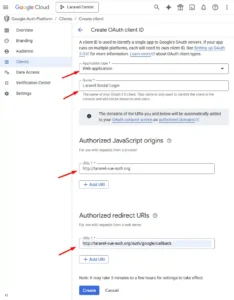
Create the OAuth Client
- Click Create OAuth Client.
- Choose Application type → Web application.
- Name it (e.g., Laravel Social Login).
- Under Authorized JavaScript origins, add your frontend URL:
http://laravel-vue-auth.org - Under Authorized redirect URIs, add your Laravel callback route:
http://laravel-vue-auth.org/auth/google/callback - Click Create.
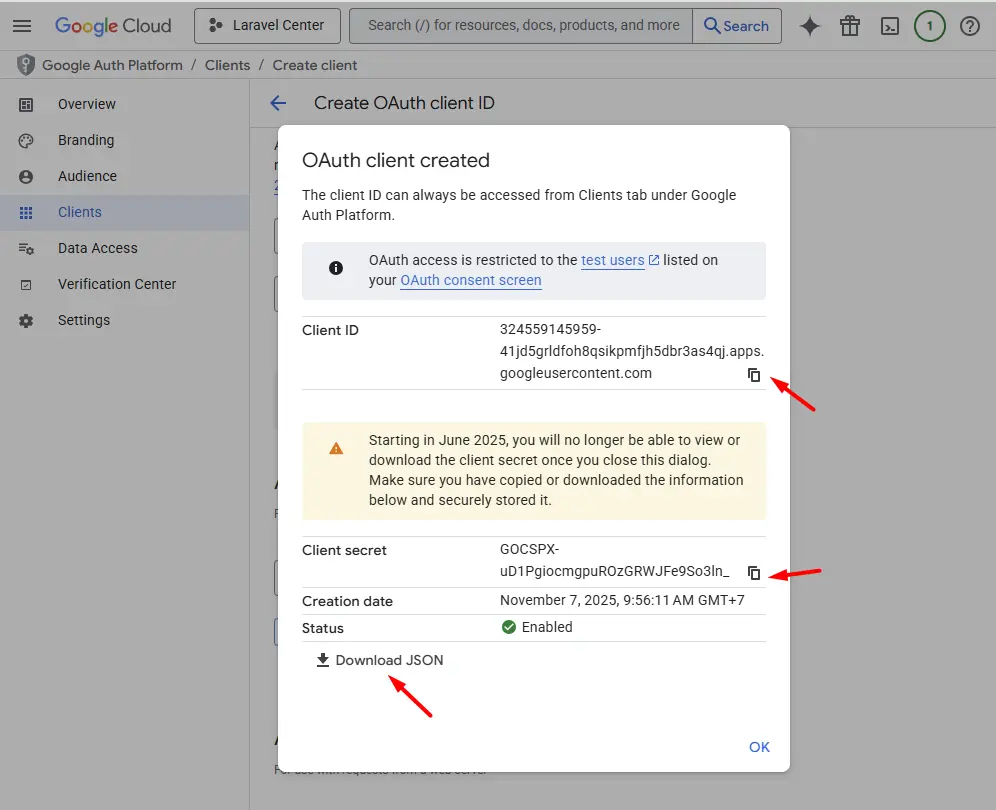
Copy Your Credentials
After creating your OAuth client, Google will provide you with two important credentials — Client ID and Client Secret.
Make sure to copy and store these values safely, as you’ll need them later when configuring Google Socialite for your Laravel Vue.js SPA Google Login setup. Losing them may require you to regenerate new credentials in the Google Cloud Console.
Step 3: Install Laravel Socialite
Next, install Laravel Socialite — the official package that simplifies social authentication. It’s the key library that powers the Laravel Vue.js SPA Google Login process.
Install it with Composer:
composer require laravel/socialiteStep 4: Configure Google in .env and config/services.php
Add your Google OAuth credentials to the .env file and configure them in config/services.php. This step links your Laravel backend to Google’s API for the Laravel Vue.js SPA Google Login integration.
GOOGLE_CLIENT_ID=your_google_client_id
GOOGLE_CLIENT_SECRET=your_google_client_secret
GOOGLE_REDIRECT_URL="${APP_URL}/auth/google/callback"
Then open config/services.php and add this section:
'google' => [
    'client_id' => env('GOOGLE_CLIENT_ID'),
    'client_secret' => env('GOOGLE_CLIENT_SECRET'),
    'redirect' => env('GOOGLE_REDIRECT_URL')
],
This connects your Laravel app to Google’s OAuth service.
Step 5: Update User Model for Google Login Fields
Update your User model to include fields like google_id and avatar. These fields store user data received during the Laravel Vue.js SPA Google Login process.
Open terminal and run this command to create a migration file:
php artisan make:migration add_google_fields_to_users_table --table=usersMigration Example:
public function up(): void
{
    Schema::table('users', function (Blueprint $table) {
        $table->string('google_id')->nullable();
        $table->string('avatar')->nullable();
    });
}
Then run:
php artisan migrateStep 6: Create Controller and Routes for Google Login
Set up a dedicated controller and routes to handle Google redirects and callbacks. These routes manage the flow of authentication in the Laravel Vue.js SPA Google Login system.
Create a controller file app/Http/Controllers/Api/GoogleAuthController.php
<?php

namespace App\Http\Controllers\Api;

use App\Http\Controllers\Controller;
use Laravel\Socialite\Facades\Socialite;
use Illuminate\Support\Facades\Auth;
use App\Models\User;

class GoogleAuthController extends Controller
{
    public function redirect()
    {
        return Socialite::driver('google')->stateless()->redirect();
    }

    public function callback()
    {
        $googleUser = Socialite::driver('google')->stateless()->user();
        $user = User::where('email', $googleUser->email)->first();
        if (!$user) {
            $user = new User();
        }
        $user->name = $googleUser->name;
        $user->google_id = $googleUser->id;
        $user->avatar = $googleUser->avatar;
        $user->password = '';
        $user->save();
        Auth::login($user);
        session()->regenerate();

        return redirect('/');
    }
}
Then we need to create two routes: one for redirecting users to Google, and another for handling the callback.
use App\Http\Controllers\Api\GoogleAuthController;

Route::get('/auth/google/redirect', [GoogleAuthController::class, 'redirect']);
Route::get('/auth/google/callback', [GoogleAuthController::class, 'callback']);
This code:
- Redirects the user to Google for login.
- Handles the callback to log in or register the user.
- Creates a Sanctum token and redirects back to your Vue app.
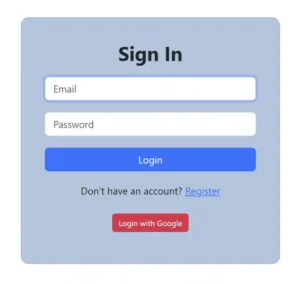
Step 7: Add Google Login Button to Your Vue Component
Integrate a “Sign in with Google” button inside your Vue.js component. This is the front-end trigger that starts the Laravel Vue.js SPA Google Login flow when users click it.
Update this login file resources/js/pages/Login.vue
<template>
    <section class="vh-100">
        <div class="container py-5 h-100">
            <div class="row d-flex justify-content-center align-items-center h-100">
                <div class="col-12 col-md-8 col-lg-6 col-xl-5">
                    <div class="card shadow-2-strong" style="border-radius: 1rem; background: lightsteelblue;">
                        <div class="card-body p-5">
                            <h1 class="mb-4 text-center fw-bold">Sign In</h1>
                            <form @submit.prevent="login">
                                <div class="form-outline mb-4">
                                    <input type="text"
                                        :class="['form-control form-control-lg', { 'is-invalid': errors?.email }]"
                                        placeholder="Email" ref="autofocus" v-model="form.email"
                                        :disabled="processing" />
                                    <span v-if="errors?.email" class="text-danger form-label" style="padding-left: 5px">
                                        {{ errors?.email[0] }}
                                    </span>
                                </div>
                                <div class="form-outline mb-4">
                                    <input type="password"
                                        :class="['form-control form-control-lg', { 'is-invalid': errors?.password }]"
                                        placeholder="Password" v-model="form.password" :disabled="processing" />
                                    <span v-if="errors?.password" class="text-danger form-label"
                                        style="padding-left: 5px">
                                        {{ errors?.password[0] }}
                                    </span>
                                </div>
                                <div class="d-grid mb-2">
                                    <button class="btn btn-primary btn-lg" type="submit" :disabled="processing">
                                        <span v-show="processing" class="spinner-border spinner-border-sm" role="status"
                                            aria-hidden="true"></span>
                                        Login
                                    </button>
                                </div>
                            </form>
                            <div class="py-3 text-center fs-5">
                                Don't have an account? <RouterLink :to="{ path: '/register' }">Register</RouterLink>
                            </div>
                            <div class="py-3 text-center fs-5">
                                <button @click="loginWithGoogle" class="btn btn-danger">
                                    Login with Google
                                </button>
                            </div>
                        </div>
                    </div>
                </div>
            </div>
        </div>
    </section>
</template>

<script setup>
import { onMounted, ref } from "vue";
import { RouterLink, useRouter } from "vue-router";
import { useAuthStore } from "@/stores/auth";

const processing = ref(false);
const form = ref({
    email: null,
    password: null,
});
const errors = ref(null);
const router = useRouter();
const autofocus = ref(null);
const auth = useAuthStore();

const login = async () => {
    processing.value = true;

    // Send to backend for evaluation
    let response = await auth.login(form.value);

    if (response.data.success) {
        router.push('/');
    }
    else {
        errors.value = response.data.errors;
        // set autofocus
        setTimeout(() => {
            autofocus.value.focus();
            autofocus.value.select();
        }, 5);
    }
    processing.value = false;
};

onMounted(() => {
    autofocus.value.focus();
});

function loginWithGoogle() {
    axios.get('/sanctum/csrf-cookie')
        .then(() => {
            window.location.href = '/auth/google/redirect'
        });
}
</script>
Final Step: Running and Testing Your Project
To test your project, run the Laravel server:
php artisan serveIf your project also uses Vue.js, run the frontend in a separate terminal:
npm run devAfter both are running, open your browser and visit:
http://127.0.0.1:8000Make sure all pages load and your features work as expected.
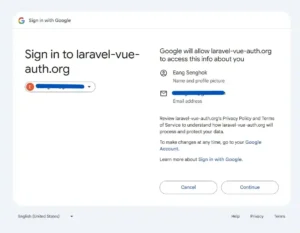
- Go to your SPA login page.
- Click Login with Google.
- Approve the access request.
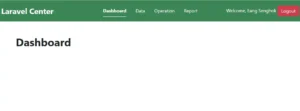
- You’ll be redirected back to your app — already logged in!

Conclusion
You’ve now completed the Laravel Vue.js SPA Google Login setup using Laravel Socialite. This integration enhances user experience, simplifies authentication, and makes your SPA more secure and user-friendly.
You can now:
- Logging in with email & password, or
- Logging in instantly with their Google account.
- Store user data from Google in your database
- Add more providers later (Facebook, GitHub, Twitter) by just repeating the same steps
This hybrid system combines the simplicity of social authentication with the security of Laravel session management — making your SPA faster, more user-friendly, and professional.