Want to build a smart Telegram bot using just PHP? You’re in the right place! In this tutorial, you’ll Create a Telegram Bot with PHP in 3 simple steps—from generating the bot with BotFather to setting up a webhook and coding a real-time response system.
In this tutorial, I’ll also show you how to use some essential Telegram bot functions such as sendMessage, editMessageText, sendPhoto, editMessageCaption, as well as how to add reply buttons, inline buttons, and handle callback queries effectively.
Let’s dive in and get your bot talking! 🤖💬
Table of Contents
Step 1: Create Your Telegram Bot with BotFather
To create a Telegram bot with PHP, start by using BotFather—Telegram’s official tool for creating bots. Send the /newbot command, choose a name and username, and you’ll receive your bot token, which is essential for authenticating requests from your PHP script.
How to create your bot:
- Open Telegram and search for @BotFather.
- Start a chat and send the command
/newbot. - Follow the instructions:
- Enter a friendly name for your bot (e.g., “My PHP Bot”).
- Choose a unique username that ends with “bot” (e.g.,
myphp_test_bot).
- Once done, BotFather will provide you with a bot token (a long string of characters). This token is essential—it authorizes your PHP script to interact with Telegram on your bot’s behalf.

Keep this token safe, as you’ll use it in the next steps.
Step 2: Set Your Webhook URL to Receive Messages
After you create a Telegram bot with PHP, the next step is to connect it to your server by setting the webhook URL. This URL tells Telegram where to send incoming messages for your bot. Use the setWebhook API method to link your bot directly to a PHP file that will handle and respond to these messages.
How to set your webhook:
- Prepare your server with a URL accessible via HTTPS (e.g.,
https://yourdomain.com/webhook.php). - Use this URL along with your bot token to register the webhook by visiting this link in your browser:
https://api.telegram.org/botYOUR_BOT_TOKEN/setWebhook?url=https://yourdomain.com/webhook.phpReplace YOUR_BOT_TOKEN with your actual bot token and https://yourdomain.com/webhook.php with your webhook URL.
- If successful, Telegram will confirm that the webhook is set.
Step 3: Create the Webhook PHP File to Respond to Messages
This is the core part of how to create a Telegram bot with PHP—writing the webhook file. This PHP script will receive updates from Telegram and send back replies. You can handle messages, send custom responses, and add interactive buttons like inline keyboards and reply buttons right from your PHP code.
Create webhook.php and paste the following:
<?php
// Get the incoming update content
$content = file_get_contents("php://input");
$data = json_decode($content, true);

// Check if the update contains a message
if (!isset($data['message']) && !isset($data['callback_query'])) {
    exit;
}

// check if the request is from callback button
if (!empty($data) && isset($data['callback_query'])) {
    sendMessage('answerCallbackQuery', ['callback_query_id' => $data['callback_query']['id']]);
    callBackAction($data['callback_query']['data'], $data['callback_query']['from']['id'], $data['callback_query']['message']['message_id']);
} else if (!empty($data) && isset($data['message'])) {

    $_message = isset($data['message']['text']) ? $data['message']['text'] : '';
    $_message = trim($_message);

    if ($_message == '/start') {
        start($data);
    } else if ($_message == '👤 User Info') {
        userInfo($data);
    } else if ($_message == '📚 Tutorial List') {
        tutorialList($data);
    }
}
http_response_code(200);

// send function
function sendMessage($sendFunction, $data)
{
    $token = '8152907919:AAGLokcGZa0ITiKI07PPBU99I2JQSBXPAfg';
    $url = "https://api.telegram.org/bot{$token}/{$sendFunction}?" . http_build_query($data);
    file_get_contents($url);
}

// start
function start($data)
{
    $chat_id = $data['message']['from']['id'];

    $keyboard = [
        ['📚 Tutorial List',  '👤 User Info']
    ];

    // keyboard
    $data = [
        'chat_id' => $chat_id,
        'reply_markup' => json_encode([
            'keyboard' => $keyboard,
            'resize_keyboard' => true
        ])
    ];

    $data['caption'] = 'Get step-by-step Laravel tutorials straight from LaravelCenter.com. Learn how to build full Laravel projects—from installation to deployment—right inside Telegram!';
    $data['photo'] = 'https://laravelcenter.com/wp-content/uploads/2025/07/laravelcenterbot.png';

    sendMessage('sendPhoto', $data);
}

// User Info
function userInfo($data)
{
    $chat_id = $data['message']['from']['id'];
    $first_name = $data['message']['from']['first_name'] ?? '';
    $last_name = $data['message']['from']['last_name'] ?? '';

    // keyboard
    $data = [
        'chat_id' => $chat_id,
        'parse_mode' => 'HTML',
        'text' => "<strong>User Information</strong>\nFirst Name : " . $first_name .  "\nLast Name : " . $last_name
    ];

    sendMessage('sendMessage', $data);
}

// Product List
function tutorialList($data)
{
    $chat_id = $data['message']['from']['id'];

    $data = array(
        'chat_id' => $chat_id,
        'caption' => 'Choose a Laravel tutorial below to begin your learning journey.',
        'photo' => 'https://laravelcenter.com/wp-content/uploads/2025/07/laravelcenterbot.png',
        'parse_mode' => 'HTML'
    );

    $keyboard = [
        'inline_keyboard' => [
            [
                [
                    'text' => 'Laravel Project',
                    'callback_data' => 'tutorial_l1#1'
                ]
            ],
            [
                [
                    'text' => 'Laravel CRUD',
                    'callback_data' => 'tutorial_l1#2'
                ]
            ],
            [
                [
                    'text' => 'Telegram Bot',
                    'callback_data' => 'tutorial_l1#3'
                ]
            ]
        ]
    ];

    $encodedKeyboard = json_encode($keyboard);

    if ($encodedKeyboard) {
        $data['reply_markup'] = $encodedKeyboard;
    }

    sendMessage('sendPhoto', $data);
}

//  callback function
function callBackAction($callback_data, $chat_id, $message_id)
{
    $callback = explode('#', $callback_data);
    $action = $callback[0];
    $action_id = $callback[1];

    if ($action == 'tutorial_l1') {
        $inline_keyboard = [];

        if ($action_id == 1) {
            array_push(
                $inline_keyboard,
                [
                    [
                        'text' => 'Laravel Vue.js POS',
                        'url' => 'https://laravelcenter.com/laravel-vue-js-pos-tutorial'
                    ]
                ],
                [
                    [
                        'text' => 'Laravel jQuery POS',
                        'url' => 'https://laravelcenter.com/laravel-jquery-pos-tutorial-for-beginners'
                    ]
                ]
            );
        } elseif ($action_id == 2) {
            array_push(
                $inline_keyboard,
                [
                    [
                        'text' => 'Laravel Vue.js CRUD',
                        'url' => 'https://laravelcenter.com/laravel-vuejs-crud-application'
                    ]
                ],
                [
                    [
                        'text' => 'Laravel jQuery CRUD',
                        'url' => 'https://laravelcenter.com/laravel-ajax-crud-with-jquery-and-modal-forms'
                    ]
                ],
                [
                    [
                        'text' => 'Laravel Inertia CRUD',
                        'url' => 'https://laravelcenter.com/inertia-crud-laravel-vue'
                    ]
                ]
            );
        } elseif ($action_id == 3) {
            array_push(
                $inline_keyboard,
                [
                    [
                        'text' => 'Telegram Bot',
                        'url' => 'https://laravelcenter.com'
                    ]
                ],
                [
                    [
                        'text' => 'Telegram Bot',
                        'url' => 'https://laravelcenter.com'
                    ]
                ]
            );
        }

        array_push(
            $inline_keyboard,
            [
                [
                    'text' => '🏘 Home',
                    'callback_data' => 'tutorial_l2#home'
                ],
                [
                    'text' => '⬅️ Back',
                    'callback_data' => 'tutorial_l2#back'
                ]
            ]
        );

        $keyboard = [
            'inline_keyboard' => $inline_keyboard
        ];

        $sendFunction = 'editMessageCaption';
        $parameters['chat_id'] = $chat_id;
        $parameters['message_id'] = $message_id;
        $parameters['caption'] = 'Choose a Laravel tutorial below to begin your learning journey.';
        $parameters['reply_markup'] = json_encode($keyboard);
        sendMessage($sendFunction, $parameters);
    } else if ($action == 'tutorial_l2') {
        if ($action_id == 'home' || $action_id == 'back') {
            $keyboard = [
                'inline_keyboard' => [
                    [
                        [
                            'text' => 'Laravel Project',
                            'callback_data' => 'tutorial_l1#1'
                        ]
                    ],
                    [
                        [
                            'text' => 'Laravel CRUD',
                            'callback_data' => 'tutorial_l1#2'
                        ]
                    ],
                    [
                        [
                            'text' => 'Telegram Bot',
                            'callback_data' => 'tutorial_l1#3'
                        ]
                    ]
                ]
            ];

            $sendFunction = 'editMessageCaption';
            $parameters['chat_id'] = $chat_id;
            $parameters['message_id'] = $message_id;
            $parameters['caption'] = 'Choose a Laravel tutorial below to begin your learning journey.';
            $parameters['reply_markup'] = json_encode($keyboard);
            sendMessage($sendFunction, $parameters);
        }
    }
}
How it works:
- Telegram sends updates (like messages) to this script.
- The script reads the incoming message.
- It sends a simple reply echoing the user’s message.
You’re Done! Test Your Bot
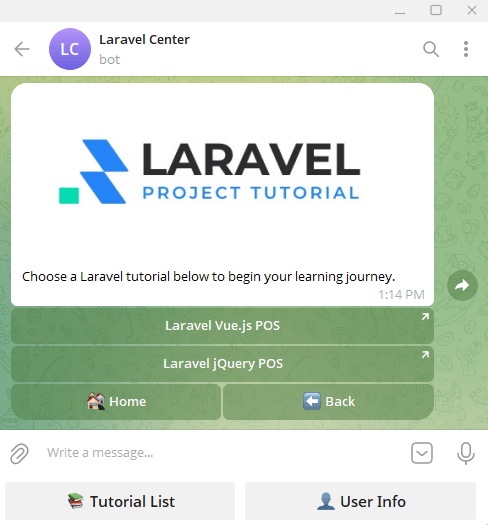
You’ve just completed the steps to create a Telegram bot with PHP! Now it’s time to test your bot. Open it in the Telegram app, tap Start, and interact with it. Try sending a message or clicking inline and reply buttons to make sure your webhook works properly and the bot responds as expected.


👉 Once your bot is up and running, you can explore all available features like sending messages, editing content, and using inline buttons by visiting the official Telegram Bot API documentation.
Related Reading
Want to automate your Telegram channel management? Check out our guide on how to auto approve Telegram join requests with a PHP user bot.