Single Page Applications (SPAs) are the backbone of modern web apps. They load content dynamically without reloading the page, creating a fast and smooth user experience.
In this tutorial, you’ll learn how to create Vue.js SPA in Laravel project — step by step. We’ll focus on navigating between multiple pages using Vue Router and highlighting the active menu when users switch between routes.
This is a beginner-friendly guide that doesn’t require API integration — perfect if you’re just getting started with Laravel and Vue.js.
Table of Contents
Step 1: Create a New Laravel Project
Open your terminal and create a new Laravel project:
You’ll first run:
composer global require laravel/installer(You only need to run this once globally).
Then you can run this command to get the interactive experience and create your project.
laravel new laravel-project-nameGo to the project folder:
cd laravel-project-nameRun the migration command
php artisan migrateThen start the Laravel development server:
php artisan serveAfter that, open another terminal and run these commands:
npm installnpm run devVisit http://localhost:8000 — you should see the Laravel welcome page.
Step 2: Install Required Packages and Frontend Dependencies
Next, we install the Vue.js related packages so Laravel can compile Vue components. This is an important step when you want to create vue.js spa in laravel project with modern tooling.
Laravel uses Vite to handle frontend assets. Let’s install Vue 3 and its Vite plugin:
npm install vue@3 @vitejs/plugin-vue bootstrapStep 3: Configure Vite for Vue
Here we enable the Vue plugin inside Vite configuration, so Laravel knows how to compile .vue files. This configuration is required to properly create vue.js spa in laravel project.
Then open vite.config.js and update it as follows:
import { defineConfig } from 'vite';
import laravel from 'laravel-vite-plugin';
import vue from '@vitejs/plugin-vue';

export default defineConfig({
  plugins: [
    laravel({
      input: ['resources/js/app.js'],
      refresh: true,
    }),
    vue(),
  ],
});
Step 4: Set Up Vue Entry Point
We then register Vue in the main app file and mount it to the HTML DOM. This is where the SPA truly begins to load, which is necessary to create vue.js spa in laravel project correctly.
Create the main Vue component file resources/js/App.vue:
<template>
    <div>
        <router-view />
    </div>
</template>
Now edit resources/js/app.js and add the following:
import './bootstrap';
import 'bootstrap/dist/css/bootstrap.min.css';
import { createApp } from 'vue';
import App from './App.vue';
import router from './router';

createApp(App).use(router).mount('#app');
Step 5: Create Page Components
In this step, we create multiple Vue pages such as Home, About, etc. Multiple pages allow real SPA navigation, which is part of how we create vue.js spa in laravel project.
Create four simple pages and a layout page in resources/js/pages/:
Home.vue
<template>
  <div>
    <h2>Home Page</h2>
    <p>Welcome to your Vue.js SPA in Laravel project.</p>
  </div>
</template>
Blog.vue
<template>
    <div>
        <h2>Blog Page</h2>
        <p>This page shows how all posts about Vue.js SPA.</p>
    </div>
</template>
About.vue
<template>
  <div>
    <h2>About Page</h2>
    <p>This page shows how routing works in your Vue.js SPA.</p>
  </div>
</template>
Contact.vue
<template>
  <div>
    <h2>Contact Page</h2>
    <p>This is a static contact page loaded without refreshing the browser.</p>
  </div>
</template>
Layout.vue
<template>
    <div>
        <header
            class="text-bg-success d-flex flex-wrap align-items-center justify-content-center justify-content-md-between py-3 mb-4 border-bottom">
            <div class="col-md-3 mb-2 mb-md-0 d-flex">
                <a href="/" class="d-inline-flex link-body-emphasis text-decoration-none">
                    <strong class="fs-3 ms-2 text-white">Laravel Center</strong>
                </a>
            </div>
            <ul class="nav nav-underline col-12 col-md-auto mb-2 justify-content-end mb-md-0">
                <li class="nav-item">
                    <RouterLink to="/" class="nav-link mx-3 text-white" exact-active-class="active">Home</RouterLink>
                </li>
                <li class="nav-item">
                    <RouterLink to="/blog" class="nav-link mx-3 text-white" active-class="active">Blog</RouterLink>
                </li>
                <li class="nav-item">
                    <RouterLink to="/about" class="nav-link mx-3 text-white" active-class="active">About Us</RouterLink>
                </li>
                <li class="nav-item">
                    <RouterLink to="/contact" class="nav-link mx-3 text-white" active-class="active">Contact Us
                    </RouterLink>
                </li>
            </ul>
        </header>
        <div class="container mt-5">
            <router-view></router-view>
        </div>
    </div>
</template>
✅ What happens here:
- We use
<RouterLink>instead of<a>to avoid full-page reloads. - The
active-class="active"attribute automatically adds theactiveclass to the link of the current route. - You can style
.activeany way you like to visually highlight the active menu.
Step 6: Install and Configure Vue Router
Vue Router allows us to switch between pages without refreshing the browser. This routing functionality is what makes it possible to create vue.js spa in laravel project with SPA navigation behavior.
Install Vue Router:
npm install vue-router@4Then create a router file resources/js/router/index.js:
import { createRouter, createWebHistory } from 'vue-router';
import Layout from '../pages/Layout.vue';
import Home from '../pages/Home.vue';
import Blog from '../pages/Blog.vue';
import About from '../pages/About.vue';
import Contact from '../pages/Contact.vue';

const routes = [
    {
        path: '/', component: Layout, children: [
            { path: '/', component: Home },
            { path: '/blog', component: Blog },
            { path: '/about', component: About },
            { path: '/contact', component: Contact }
        ]
    }
];

const router = createRouter({
    history: createWebHistory(),
    routes,
});

export default router;
Step 7: Update Blade Template
We modify the Blade template to load the Vue application inside one DOM element. This makes Laravel serve the SPA view when we create vue.js spa in laravel project.
Finally, make Laravel render the Vue app. Open resources/views/welcome.blade.php and replace the body with:
<!DOCTYPE html>
<html lang="en">
<head>
  <meta charset="UTF-8">
  <meta name="viewport" content="width=device-width, initial-scale=1.0">
  <title>Vue.js SPA in Laravel</title>
  @vite('resources/js/app.js')
</head>
<body>
  <div id="app"></div>
</body>
</html>
Step 8: Define a Laravel Route
We set a route inside Laravel web routes to return the SPA view. This is needed so the browser always loads the Vue app when we create vue.js spa in laravel project.
In routes/web.php, define a route that loads your Blade view
<?php

use Illuminate\Support\Facades\Route;

Route::get('/{any}', function () {
    return view('welcome');
})->where('any', '.*');
Final Step: Running and Testing Your Project
To test your project, run the Laravel server:
php artisan serveIf your project also uses Vue.js, run the frontend in a separate terminal:
npm run devAfter both are running, open your browser and visit:
http://127.0.0.1:8000Make sure all pages load and your feature
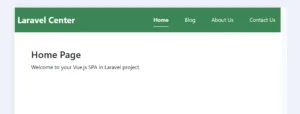
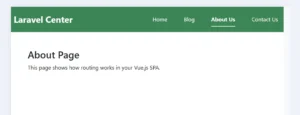
Now you can navigate between Home, Blog, About, and Contact pages — all without reloading the browser. The active menu will highlight automatically depending on the page you visit.
Conclusion
At this point, the main structure of the SPA is complete. Following these steps makes it simple to create vue.js spa in laravel project and build modern single-page frontend interfaces inside Laravel.
This simple structure can be extended to build full-scale applications with:
- Dynamic pages
- Authentication
- API communication
- Or even Vuex/Pinia state management
But even at this stage, your Laravel + Vue.js setup is a complete, professional foundation for modern SPAs.
Now that you can navigate between pages and visually highlight the active menu, you’re ready to build beautiful, interactive frontends powered by Vue.js and Laravel. 🚀
Discover more detailed Laravel and Vue SPA guides in our Laravel Vue SPA Tutorials.