Connecting your local machine to GitHub or Bitbucket using an SSH key is a secure and convenient way to manage repositories. With SSH, you won’t have to enter your username and password every time you push or pull changes.
In this guide, we’ll show you how to set up SSH key for GitHub or Bitbucket, step by step. Whether you’re a beginner or just switching from HTTPS to SSH, this tutorial will make the process easy and clear.
Table of Contents
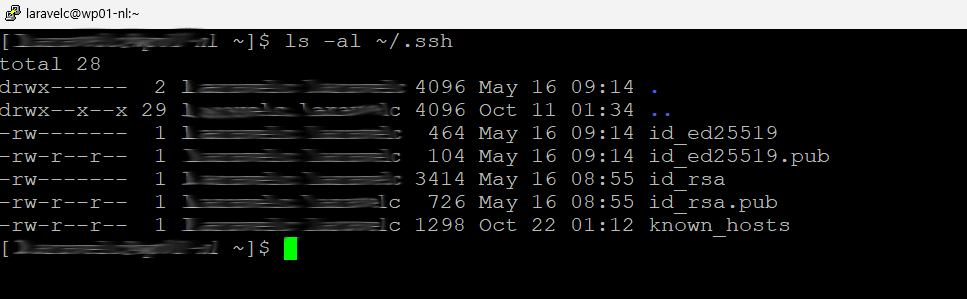
Step 1: Check for Existing SSH Keys
Before you set up SSH key for GitHub or Bitbucket, check whether you already have an SSH key on your local machine.
Run the command below in your terminal:
ls -al ~/.sshDescription:
This command lists all files in your .ssh directory. Look for files named id_rsa and id_rsa.pub (or similar). If they exist, you can use them instead of creating a new key.
Step 2: Generate a New SSH Key
If you don’t have any SSH key, it’s time to generate a new one.
To set up SSH key for GitHub or Bitbucket, use the following command:
ssh-keygen -t ed25519 -C "[email protected]"Or if your system doesn’t support Ed25519, use RSA:
ssh-keygen -t rsa -b 4096 -C "[email protected]"Description:
-tspecifies the type of key (ed25519orrsa)-Cadds a comment (usually your email)- Press Enter to save in the default location (
~/.ssh/id_ed25519) - Enter a passphrase for extra security (optional but recommended)
Step 3: Add SSH Key to the SSH Agent
Next, you need to start the SSH agent and add your key.
This is an essential step when you set up SSH key for GitHub or Bitbucket, ensuring smooth authentication when connecting to repositories.
Run these commands:
eval "$(ssh-agent -s)"Add your new SSH key:
ssh-add ~/.ssh/id_ed25519Description:
This ensures your key is loaded and ready for authentication when connecting to GitHub or Bitbucket.
Step 4: Copy the SSH Public Key
Now, copy the content of your public key file.
You’ll need it when adding the SSH key to your GitHub or Bitbucket account.
cat ~/.ssh/id_ed25519.pubDescription:
Copy the entire output to your clipboard — this will be used in the next steps to set up SSH key for GitHub or Bitbucket successfully. You’ll need this key to add to your GitHub or Bitbucket account.

Step 5: Add the SSH Key to GitHub
- Log in to GitHub
- Go to Settings > SSH and GPG keys > New SSH key
- Enter a title (e.g., “My Laptop”) and paste your public key
- Click Add SSH Key
Description:
GitHub will now recognize your machine and allow secure SSH authentication.
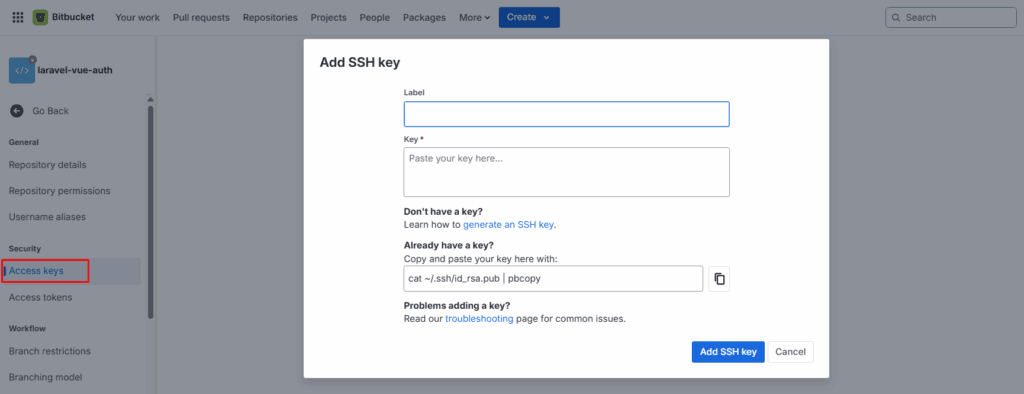
Step 6: Add the SSH Key to Bitbucket
- Log in to Bitbucket
- Go to Personal Settings > SSH Keys > Add Key
- Enter a label (e.g., “Work Laptop”) and paste your public key
- Click Add Key
Description:
Bitbucket now recognizes your key, allowing password-less Git operations.
Step 7: Test the SSH Connection
After you set up SSH key for GitHub or Bitbucket, it’s important to test whether it works properly.
GitHub:
ssh -T [email protected]You should see:
Hi username! You've successfully authenticated, but GitHub does not provide shell access.Bitbucket:
ssh -T [email protected]You should see a success message for Bitbucket authentication.
Description:
Testing confirms that your SSH key is working properly and your local machine can communicate securely with the remote repository.
Step 8: Change or Clone Existing Repository
If your repository is currently using HTTPS, change it to SSH:
git remote set-url origin [email protected]:username/repo.gitIf you’re new to the project and want to clone the repository to your local machine, use the following command:
git clone [email protected]:username/repo.gitDescription:
This updates your local Git configuration to use SSH instead of HTTPS for pushes and pulls.
Tips for Using SSH Keys
Here are some quick tips to manage your SSH keys effectively:
- Use strong passphrases for your private keys.
- Keep backup copies of your SSH keys in a safe location.
- Use different SSH keys for work and personal projects.
- Regularly review your authorized keys on GitHub or Bitbucket for security.
These best practices help maintain a secure setup when you set up SSH key for GitHub or Bitbucket.
Conclusion
That’s it! You’ve learned how to set up SSH key for GitHub or Bitbucket step by step.
With SSH authentication, you can securely manage your repositories, push and pull changes faster, and avoid constant username/password prompts.
By completing this guide, your Git setup is now more professional and secure — ready for any project you work on.
Related Tutorials
- Push Local Project to Remote Repository
- Important Git Commands Every Developer Should Know